
También puedes leer este artículo en:Español
Oh, the food! What could we humans do without food? But, if there is something better for an otaku, it is anime themed food! True otaku get happy and shiny eyed when we see sweet food. So, it is time to make an epic travel to the culinary world of anime desserts.
The Japanese are traditionally inclined to pay attention to the presentation of food. Thus, it is expected that their meals don’t only taste fabulous, but also look great. In case you forgot, look at these gorgeous bento boxes before heading straight to the dessert’s realm. Some of our anime inspired desserts are already legendary and a must if you happen to visit the place where they are made. Others are authentic curiosities that you can try to make yourself if you want to impress your otaku friends or simply can’t resist their awesomeness.
Warning: kids, we don’t want accidents here. If you are a minor, make sure an adult is with you, especially when you manipulate hot kitchen instruments, boiling water, knifes and the like. Always use apron and protect your hands. Don’t get too close to the oven or to the stove flames. We also recommend you to find alternatives to ingredients that you can’t consume. Without further ado, let’s go!
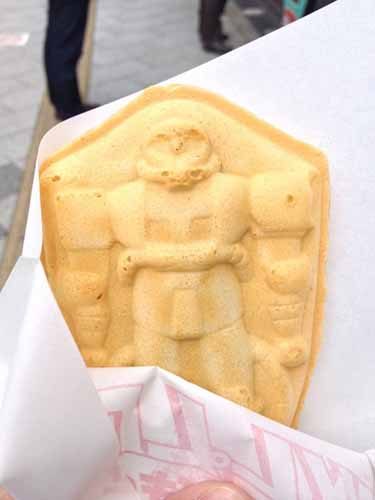
10. Gundam Ningyo Yaki
This is a classic from the Gundam Cafe at Akihabara, in Tokyo. You will need special iron molds that you can buy at Asian food stores.
What you will need:( Serves 1 or more people )
How to Cook It:
1
Mix the stirred flour and the baking powder.2
Add the the egg. Stir away.3
Add the honey. Keep mixing.4
Add the milk and mix.5
Add the vegetable oil and keep mixing. If you feel like the mix is too thick, you can add a little bit more of milk.6
Pour the mix into the oiled mold, filling it to about half.7
Put a small ball of bean paste in the middle and pour in more of the batter.8
Bake in a preheated oven at 170 degrees for 15 minutes.9
Take the mold out with cooking gloves and wait until it cools down.
You can also watch the procedure here:
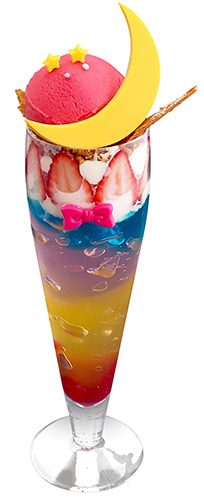
9. Sailor Moon Parfait
The Sailor Moon parfait is the perfect touch for a romantic and sophisticated date in Tokyo bay, especially by night! Summer demands a Sailor Moon themed parfait, full of romance and magic, just like the anime!
Alternative ingredients: we recommend trying different types of sorbets (water based ice creams), as long as they are made with bittersweet fruits. You can also try to use other types of berries or chocolate cookies.
What you will need:( Serves 1 or 2 people )
How to Cook It:
1
Break the cookies inside a plastic bag.2
Separate the egg yolks from the whites.3
Add a pinch of salt to the yolks.4
Beat the egg whites with a mixer blender until you get stiff peaks5
Put the chocolate in a bowl, add one yolk and next the egg whites. Mix with care.6
Prepare the jelly according to the instructions of the package. Let it cool down, but not so much that it becomes solid. You can create each layer one at a time by chilling one layer and then starting the next layer on top.7
Now here is the fun part: you have to get one or two cups for the parfaits. Start with a base of cookies, next put some chocolate cream, and next pour the jelly. Put the parfaits on the fridge and wait until the jelly solidifies.8
Time to serve our Sailor Moon parfait! Put a small ball of sorbet on the top and decorate with strawberries.
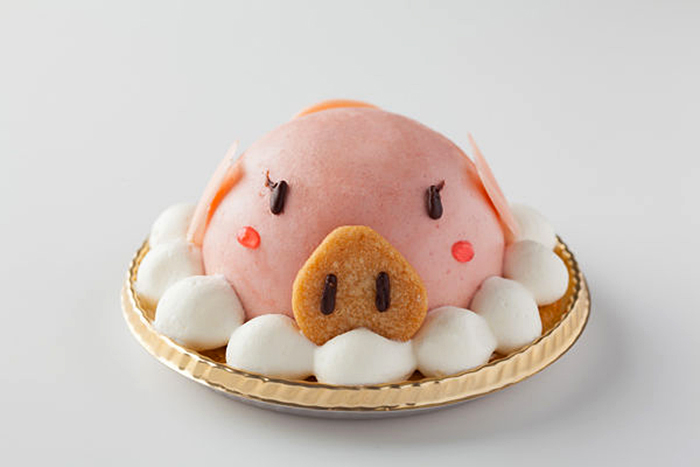
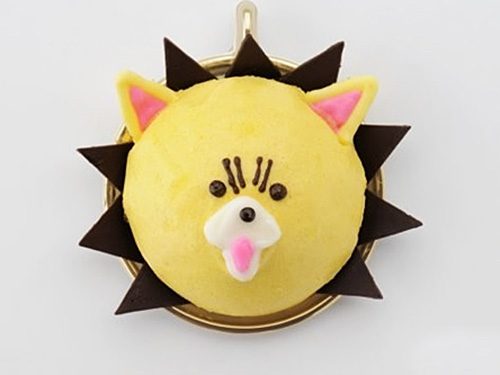
8. Kon Dome Cake
Our dear friend from Bleach gets his own themed cake! This flavor is sweet and unique at the same time, just like Kon.
Alternative ingredients: The cake mix can be substituted with pancake mix. You can also add plain yogurt instead of fresh cream. Try to make this cake with mango instead of pumpkin! In that case, you won’t need to boil the fruit to soften it up.
What you will need:( For 2 cakes )
How to Cook It:
1
Cut the pumpkin in half and take out the seeds.2
Cut the pumpkin in squares. Pour water until halfway in a pot and put the pumpkin inside to boil without touching the water for 20 minutes.3
Wait until the pumpkin cools down and peel it. Pour it into a bowl and smash it with your favorite big spoon.4
Add the sugar, cream cheese, and fresh cream. Mix well.5
Prepare the gelatin according to the instructions of the package and add it to the mix.6
In another bowl, break one egg and mix it with the vanilla cake flour. If it is too dry, you can add a little bit of water.7
Pour the cake mix on a cake mold previously protected with waxed paper. Bake at medium temperature (around 350 degrees) until it is slightly brown but soft. An adult can check this with a toothpick.8
Take out the baked cake and wait until it cools down to take it out from the mold. Cut it to have two cake bases.9
Here is the funny part: you will pour the pumpkin mousse in layers over the cake bases, trying to make a semi spherical shape. If the mousse doesn’t hold the shape very well, you can use the round cake mold, by putting the cake base on the bottom and then pouring the mousse.10
Keep the cakes in the fridge until they solidify.11
Cut the chocolate to make triangles and put them around the kon cakes.12
Add the details for the face with chocolate syrup.
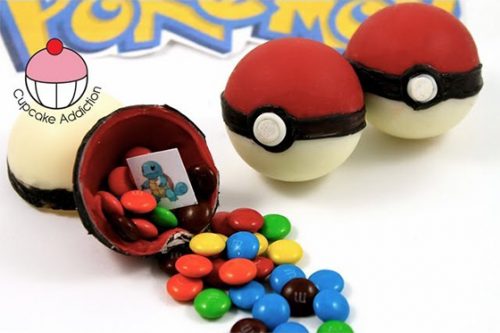
7. Pokeball candies
In order to be the very best, we need pokeballs. Or perhaps maybe just pokeball candies. Fun and full of surprises inside, just like the real pokeballs, these are the perfect prize after a good session of Pokemon Go!
What you will need: (Serves 1 or more people)
How to Cook It:
1
Simply put some red candy melt on half the molds, and white chocolate in the other half.2
Put the mold in the fridge until the candy and chocolate harden.3
Pour a new coat of candy and chocolate in the molds, to make sure they will hold their shape.4
Put them back in the fridge until they harden. Take them from the mold by stretching the mold carefully.5
Put colorful candies and a pokemon printout inside the red halves.6
Pour the leftover melted chocolate in a plastic bag and seal it. It’s for pipetting! Cut the tip carefully with scissors.7
We will use this melted chocolate as glue to seal the pokeballs! Spread it carefully on the border of the white halves and paste them to the red halves.8
You can pour a little bit more melted chocolate around the division to seal it better.9
Paint the black details of the pokeball with the black candy melt and the paintbrush.
To get the printables, you can check this link:
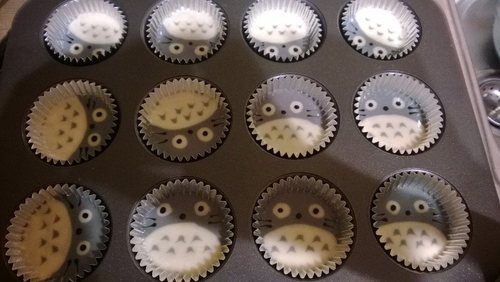
6. Totoro tarts
Here we are going to introduce you to a dessert with peanut butter flavor! But the twist is that it does not contain peanuts, so it is ideal if you have allergy. It is simply whimsical, as Totoro is.
What you will need: (Serves 3 to 4 people)
How to Cook It:
1
Put the sesame seeds and 1 T sugar in the food processor or mixer blender, and grind about 2-3 minutes.2
Mix the 3 teaspoons of water and the gelatin.3
Put milk, sugar, and half a cup of sugar into a saucepot over medium-high heat, stirring continuously.4
Once it starts to boil, add the gelatin and stir until it melts.5
Remove from heat and mix the whipping cream slowly.6
Drain out the sesame seeds from the liquid and let it cool down a little bit.7
Pour the mix into containers or baked tart shells, and store them in the fridge. You can buy frozen tart dough in some supermarkets, make the shells and bake them according to the instructions before preparing the pudding.8
Time to decorate! Make Totoro’s belly and eyes with whipped cream in a plastic bag with the tip cutted.9
Make Totoro’s eyes and face with melted chocolate and a toothpick.10
You can also make little leaves with a cookie mold or cut them with a butter knife on the green fondant.
The procedure can also be seen here
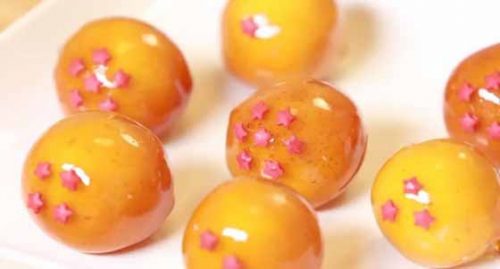
5. Dragon Ball creme brulee cake pops
Why search for the Dragon Balls if you can make them out of cake? Goku would approve. Plus this recipe is fun to make, just like Dragon Ball!
What you will need: (Serves 2 people)
How to Cook It:
1
Prepare the white cake according to the instructions of the package. Let the cake cool when finished baking.2
Boil water in a big pot.3
Pour the cream in a mid sized pot and boil it at a low temperature.4
Pour the vanilla in the cream and mix.5
Mix the egg yolks and the sugar in a bowl.6
When the cream boils and starts growing, carefully take it away from the heat. Wait 10 minutes.7
You can now add the cream to the egg yolks slowly, little by little.8
Take off the bubbles from the cream with a spoon. Now you can pour the cream into cereal bowls.8
We will use a glass baking dish to bake the cream. Put a towel on the base, next the cereal bowls with the cream into the dish, and pour the boiled water into the dish around them. Bake for 30 minutes at 350 degrees.9
Once your creme brulee is baked, you will put it in the fridge for 4 hours.10
Meanwhile, we will make crumbs out of the cake.11
Mix one of the creme brulee bowls with the cake crumbs.12
Now take a pan and cover it with wax paper. We are going to make balls out of the cake crumbs and put them onto the wax paper.13
Put the balls back in the freezer for two hours.14
Now we can stick the lollipop sticks into the balls15
To make the sugar dip, we need ⅔ of a cup of water, the same quantity of corn syrup, and three cups of sugar. Pour all of this in a pot.16
Heat the mixture in a medium-high temperature. Stir until the sugar is dissolved.17
Leave the mixture around ten minutes, until it boils and changes to a golden color.18
To retire the sugar dip, you will need to put ice cubes in a bowl and submerge the pot carefully. Wait until the dip stops boiling.19
Now you can dip your cake pops in the sugar dip. Careful, it is really hot!20
When they cool down a little, decorate with the stars.
You can also watch the procedure here:
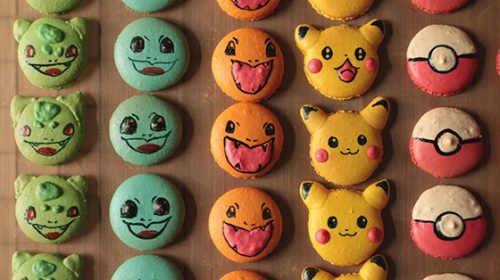
4. Pokeball macarons
Pokeballs can also be made out of macarons! These might not be as 3dimensional as the pokeball candies, but they are as sweet and cute as the Pokemons themselves.
What you will need:( Serves 2 to 3 people )
How to Cook It:
1
Preheat the oven to 300 F2
Mix the almond flour and powdered sugar.3
Beat the egg whites until they are foamy and add in granulated sugar. Whip them for around 10 minutes until stiff peaks form.4
Add the almond flour and the sugar to the mix gently.5
Divide the batter into two bowls and add red gel food coloring to one.6
Put the batters into separate pastry bags or plastic bags with their tip cut.7
You can draw circles of around 1.5” over a waxed paper to help you pipe the macarons. Make half of the circles with the red batter, and the other half with white batter.8
Leave them for around half an hour until they are dry, and bake at 300 degrees for 20 minutes.9
Allow macarons to cool, and decorate with the melted chocolates, piping them from plastic bags.10
You can fill the macarons now with buttercream. Just use two to sandwich the cream between them.
You can check the procedure on this video as well
3. Sailor Moon chocolate
So you want a sophisticated dessert that helps your chocolate cravings? Are you an otaku that loves to draw? How about making a Sailor Moon out of chocolate? Our Usagi would approve your sweet tooth, plus she herself loves to draw and read manga!

What you will need:( Serves 1 person )
How to Cook It:
1
First choose the Sailor Moon drawing you want to make. We recommend to do just the head for starters.2
Melt down the white chocolate and reserve some of it to mix the colors you will need. Put every color in a different plastic bag and make a very tiny cut in the tip as you need them.3
To make the skin color, you can mix a little bit of yellow, a little bit of red, and a tiny bit of blue into the white chocolate. Just a little! We don’t want a pumpkin colored Sailor Moon.4
Paste the drawing over the table with some tape and also paste the waxed paper over the drawing.5
We will start to draw the outlines of Sailor Moon in the waxed paper with dark chocolate. Be patient and correct any mistakes with a toothpick.6
Fill the big details with the colored chocolates, one color at a time.7
Here comes the fun. We will pipe a layer of white chocolate over our drawing.8
Cover it with another sheet of waxed paper and let it harden.9
Take off the waxed paper and enjoy!
You can watch the procedure here
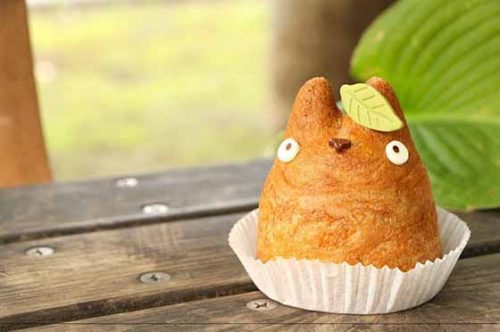
2. Totoro Creampuffs
These are the signature dish in Shirohige’s Cream Puff Shop, a Coffee Shop that is like a secret treasure in the middle of the urbanized Japan. Just as My neighbor Totoro, the magic is on the cute little things. And what can be cuter than these Totoro creampuffs?
What you will need:( Serves 3 persons )
How to Cook It:
1
Mix 1 egg, milk, sugar and the vanilla extract. Stir for around 15 minutes at medium temperature.2
Pour this custard in a bowl and cover with plastic. Refrigerate.3
Put the water, butter and two pinches of salt in a pot to boil.4
Sift in 6 tablespoons of flour and mix together. Once it forms a dough, let it cool down.5
Mix a battered egg until the dough gets “melty”.6
Pour the dough into a plastic bag and pipe over the waxed paper, forming pears. Then add Totoro ears to these pears.7
Bake at 400 degrees for 10 minutes and then lower to 350 during 15 minutes.8
Let the puffs cool down before cutting a small hole in the bottom and filling them up with the custard. Pipe the custard in with the help of a plastic bag.9
Make the eyes and face details with white and milk chocolate.
You can watch the procedure here
1. One Piece Nerikiri
And finally, the number one anime inspired dessert is here: nerikiri is a traditional Japanese marzipan, and what could be better than making it with the shape of characters from One Piece? This is fun, colorful and yummy to say the least. So let’s go into a Pirate Adventure to make some nerikiri!

What you will need
How to Cook It:
1
Add water to the flour slowly and mix with your fingers.2
Put the shiroan and the mix in a pot. Stir well in medium heat and turn off the stove.3
We will divide the shiroan in half and store this half in a bowl. Divide the other half into five different containers and add food colouring. We will need brown and black shiroan this time, besides the basic colors.4
Make the human characters using the colorless shiroan for the flesh. If you like sculpting or molding, you will love to try to make chibi versions of the One Piece gang!
If you need examples, you can check the video
Final thoughts
And there you go! Ten examples of delicious desserts with all the joy of anime. We would love to see your pics or homemade videos if you try any of the recipes. We would also love to hear if you have some extra cooking advice too! See you soon and happy cooking! Feel free to tweet us with pictures of your creations!

Author: Sakura_Moonprincess

Recommended Post
Top 10 Anime Bento Lunch [Best Recommendations]

Recommended Post
Top 10 Cooking/Food Anime [Updated Best Recommendations]

Recommended Post
Top 10 Anime Food You Want to Eat [Best Recommendations]
Recommended Post